
Night Cinematography : Basics !
Oct 03 2025
Lighting the Story: Practical Insights on Contrast, Moonlight, and On-Set Realities
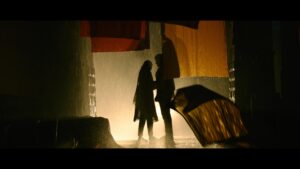
Above image from Ghaati: Manojh Reddy
Cinematography is often described as “painting with light,” but in practice, it’s far more like engineering emotion under pressure. Every day on set, we’re challenged to balance art and reality — whether we’re creating bold contrast, shaping moonlight, or improvising when plans collapse. The following insights focus on practical approaches that experienced cinematographers use to stay in control while keeping the story alive.
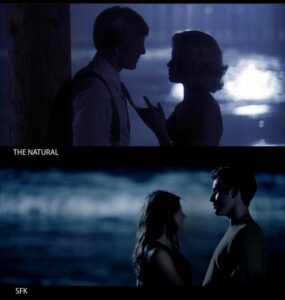
1. Dramatic Contrast Without Losing Realism
Bold contrast is one of the strongest visual tools we have — but it’s easy to push too far and break believability. Realism is not about flat lighting; it’s about plausibility. Even a high-contrast frame must feel like the light could exist in that world.
Practical Tips:
Anchor contrast to a motivated source. If your key light is meant to be a streetlamp, place it logically and let its intensity fall naturally. Once the motivation is clear, the audience accepts even extreme ratios.
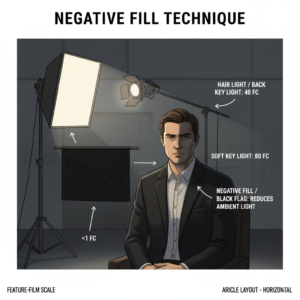
Control your fill carefully. Instead of flooding shadows, try negative fill with black flags or curtains. This deepens shadows without artificial-looking light.
Use contrast to shape story beats. A scene’s emotional shift can be emphasized by slowly widening or tightening the lighting ratio — an approach that keeps the image dynamic without breaking immersion.
Test exposure latitude. Modern sensors allow deep shadows with detail. Use false color or waveform to ride the line between rich blacks and lost detail.
Fixture Choices: Fresnels or spot LEDs for crisp key light, diffused panels or bounce for minimal fill. Even a single hard source with thoughtful control can create drama.
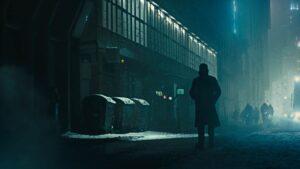
2. Shaping Moonlight and Controlling Spill
Moonlight is one of those cinematic illusions: it doesn’t really exist as we depict it, yet audiences believe it instantly. The trick is to mimic the physics while shaping the aesthetics.
Practical Tips:
Height and direction matter. Keep your moonlight high and back — as if it’s falling from above, not from eye level.
Don’t over-blue it. Slightly cooler than daylight (around 6000–6500K) feels real. Overly blue light reads as theatrical.
Control the spread. Moonlight should caress surfaces, not flood the set. Flags, barn doors, or softboxes with grids are essential to avoid lighting unintended areas.
Combine with ambient sources. A little bounce from the ground or fill from practicals helps keep faces readable without killing the nocturnal feel.
Fixture Choices: Large HMIs or daylight-balanced LEDs pushed through diffusion for soft, natural moonlight. PAR HMIs with CTB gels can provide distance throw for outdoor setups.
3. Pre-Visualizing and Diagramming Lighting
No great lighting happens by accident. Even if we improvise on set, our foundation is usually built in prep. Pre-visualizing lighting helps you anticipate problems, communicate clearly, and protect creative intent.
Practical Tips:
Sketch lighting plans for key scenes. Even rough diagrams help you and your gaffer speak the same language. Mark where sources, stands, flags, and power will go.
Include story intention in your diagrams. Notes like “soft melancholy backlight” or “split key for tension” guide decisions on set.
Use software tools. Shot Designer, Cine Tracer, or even digital storyboards allow you to visualize lighting changes and plan blocking simultaneously.
Share pre-light plans with the team early. This ensures your G&E crew can prepare rigs, cable runs, and modifiers in advance — saving hours on the day.Fixture Choices: Choose your lights based not only on look but on location constraints and setup speed. Sometimes a slightly less perfect source is worth it if it avoids rigging delays.
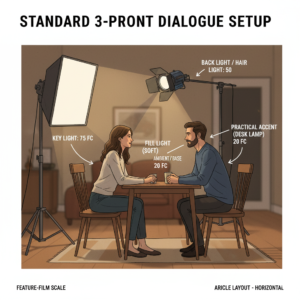
4. Working with G&E: Speaking Their Language
Lighting is a team sport. A cinematographer’s best work depends on a strong relationship with the Gaffer and Key Grip. Clear communication can save both time and quality.
Practical Tips:
Be specific. Instead of “Can we make it moodier?” say, “Let’s cut fill from camera left and add a ½ CTO on the key.” Precision avoids confusion.
Share visual references. Mood boards and lighting diagrams reduce guesswork and ensure everyone is aiming for the same tone.
Listen to their ideas. Gaffers and grips often know tricks to achieve the same result faster or safer. Collaboration is part of authorship.
Respect time and order. If you’re shifting setups, give advance notice — moving a 12K HMI isn’t as quick as flipping a switch.
5. When Things Go Wrong — And They Will
No plan survives first contact with the set. Weather shifts, power drops, or the location changes at the last minute. The cinematographers who thrive are those who adapt without losing the story.
Practical Tips:
Always have a backup plan. Keep smaller battery-powered LEDs or lightweight fixtures on standby.
Embrace accidents. A blown light might force you into a more naturalistic look — which could suit the story better.
Use available light. Don’t hesitate to incorporate practicals or ambient sources when gear fails. Shape them with flags, bounce, or diffusion.
Prioritize intention over technique. If the plan changes, ask: “What was this light supposed to express?” and find another way to express it.
Lighting is not just a technical craft — it’s a language. The more fluently we speak it, the more flexibly we can tell stories even when conditions change. Mastery lies in the middle ground: between dramatic boldness and believable realism, between meticulous planning and on-the-fly invention.
Cinematography will always be about more than gear and exposure. It’s about shaping emotion — and knowing how to do it with whatever the day gives you.
Pro Tip: Include intended shadow direction and actor movement paths in your plan — lighting that looks beautiful but doesn’t follow blocking will fail on set.
🤝 4. Working With G&E and Communicating Clearly
Goal: Turn vision into execution with speed and accuracy.
Parameter Recommendation
Pro Tip: G&E teams think spatially. Give them angles, distances, and output levels instead of adjectives — it shortens setup time dramatically.
⚙️ 5. When Things Go Wrong — Rapid Adaptation Strategies
Goal: Maintain the emotional intent of the scene under changing conditions.
Parameter Backup Choices
Pro Tips:
Plan for power loss: Keep one battery-powered fixture ready as emergency fill or key.
Leverage practicals: Table lamps or streetlights shaped with diffusion can become motivated keys.
Ride the weather: Cloud cover? Adjust exposure and use bounce boards to restore shape instead of relighting everything.
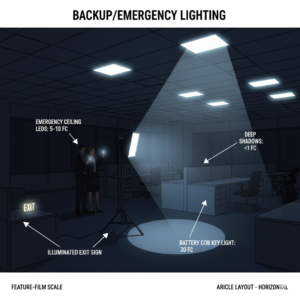
📊 Quick Reference Table – Suggested Foot-Candles by Scenario
Lighting the Story: Real-World Techniques for Cinematographers
Practical foot-candle targets, light angles, heights, and fixture choices for advanced lighting control
🎥 1. Creating Dramatic Contrast Without Losing Realism
Goal: Strong visual depth and mood while maintaining believable light motivation.
| Parameter | Recommendation |
|---|---|
| Key Light Intensity | 30–50 fc (interior drama) / 100–150 fc (day interiors) |
| Fill Light Intensity | 5–10 fc for moody contrast (6:1 to 10:1 ratio) |
| Backlight | 15–25 fc for separation |
| Angle | 35°–45° from camera axis for key; fill at ~90° for natural wrap |
| Height | 6–8 ft for dialogue scenes; higher (~10 ft) for dramatic top light |
| Light Types | Fresnels or hard LED sources for crisp shadows; diffused panels for subtle fill |
Technique Notes:
- Always tie the key light to a believable source — a window, lamp, or doorway.
- Use negative fill (black flags) instead of adding more light to deepen shadows without breaking realism.
- Use egg crates or grids to confine spill and preserve depth in the shadows.
🌙 2. Shaping Moonlight and Controlling Spill
Goal: Soft, directional, believable moonlight that feels natural on camera.
| Parameter | Recommendation |
|---|---|
| Intensity | 3–8 fc (exteriors) / 2–5 fc (interiors) — moonlight should feel dim |
| Angle | 40°–60° back three-quarter for most natural moonlight direction |
| Height | 20–30 ft for exteriors (high rig or condor) / 10–14 ft indoors |
| Color Temp | 6000K–6500K (slightly cooler than daylight) |
| Light Types | HMI (M40, M90), daylight LEDs (Aputure 600D, SkyPanel S60 with grid) |
Technique Notes:
- Push large daylight sources through 1/4 or 1/2 diffusion frames to simulate scattered atmospheric light.
- Use flags and toppers to prevent moonlight from flattening the scene or hitting unwanted walls.
- For control, add negative fill below eye level to create soft, sculpted faces at night.
📐 3. Pre-Visualizing and Diagramming Your Lighting Strategy
Goal: Translate mood and story intent into a lighting plan that your crew can execute efficiently.
| Element | Practical Guideline |
|---|---|
| Lighting Ratio Targets | Drama: 8:1 – 10:1; Naturalism: 3:1 – 5:1 |
| Base Exposure Level | 20–30 fc for night interiors; 100–150 fc for day interiors |
| Diagram Notes | Mark key, fill, backlight with beam spread, angle, and stand height. |
| Software | Shot Designer, CineTracer, or hand-drawn diagrams with fc targets labeled. |
Pro Tip: Include intended shadow direction and actor movement paths in your plan — lighting that looks beautiful but doesn’t follow blocking will fail on set.
🤝 4. Working With G&E and Communicating Clearly
Goal: Turn vision into execution with speed and accuracy.
| Parameter | Recommendation |
|---|---|
| Language | Speak in measurable terms: “Let’s bring the key to 40 fc at 45°” instead of “Brighter.” |
| Rigging Height Ranges | 12–20 ft for wide interiors, 20–40 ft for exteriors on condors. |
| Beam Control Tools | Flags, nets, cutters, diffusion frames, grids, toppers. |
Pro Tip: G&E teams think spatially. Give them angles, distances, and output levels instead of adjectives — it shortens setup time dramatically.
⚙️ 5. When Things Go Wrong — Rapid Adaptation Strategies
Goal: Maintain the emotional intent of the scene under changing conditions.
| Parameter | Backup Choices |
|---|---|
| Portable Light Levels | 10–30 fc using battery-powered LEDs (Aputure 300D/600D, Nanlite Forza 300) |
| Angles | Same as planned — re-create key direction even with smaller units |
| Height | Use C-stands or high rollers to mimic original angles quickly |
Pro Tips:
- Plan for power loss: Keep one battery-powered fixture ready as emergency fill or key.
- Leverage practicals: Table lamps or streetlights shaped with diffusion can become motivated keys.
- Ride the weather: Cloud cover? Adjust exposure and use bounce boards to restore shape instead of relighting everything.
📊 Quick Reference Table – Suggested Foot-Candles by Scenario
| Scene Type | Key (fc) | Fill (fc) | Back (fc) | Notes |
|---|---|---|---|---|
| Day Interior | 100–150 | 30–50 | 50–70 | Soft key through diffusion or bounce |
| Night Interior | 20–40 | 5–10 | 10–20 | High ratio, controlled fill |
| Moonlit Exterior | 3–8 | 1–3 | 2–5 | Large, soft back three-quarter |
| High-Drama Scene | 30–50 | 3–5 | 15–20 | 8:1+ ratio, strong negative fill |
🎬 Final Thought
Mastery of light isn’t just knowing how it looks — it’s knowing how much, from where, and with what. Thinking in terms of foot-candles, beam angles, and mounting height elevates you from painter to engineer — and that’s where great cinematographers live.
It’s in that sweet spot — between creativity and precision — that lighting stops being just illumination and becomes cinematic storytelling.
where to place lights
camera setting
methods of shaping lights
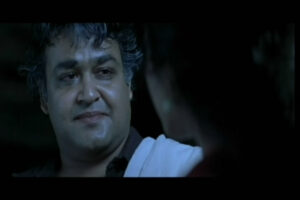
about night lighting cinematography
Lighting placement, camera settings, and light-shaping techniques are the foundation of compelling night cinematography. Successful night scenes depend on careful control over contrast, exposure, and mood through both lighting and camera tech choices.
Light Placement for Night Cinematography
– Practical sources (lamps, streetlights, candlelight) are often used to create believability and natural motivation for lighting .
– Key lights are typically placed to mimic the direction and quality of moonlight or urban sources, positioned high and at angles to create shadows and shape facial features .
– Rim or backlights help outline subjects against dark backgrounds, separating them and suggesting ambient nighttime glow .
– Fill lights are kept subtle, often bounced or diffused, to maintain darkness while preserving detail in the shadows .
Camera Settings for Night Scenes
– Use of wide apertures (low f-stop values) allows more light to hit the sensor, preserving exposure without over-lighting the scene .
– Higher ISO settings boost sensor sensitivity, but balance is needed to avoid excessive noise typical of night shooting .
– Slower shutter speeds can be used with locked-off shots to increase light, but risk motion blur if subjects are moving .
– White balance is adjusted towards cooler tones (around 4000K or lower) to mimic moonlight or warmer for urban/tungsten sources .
Methods of Shaping Light
– Flags, cutters, and barn doors are used to block or shape spill, sharpening control over where the light falls .
– Softboxes and diffusion (tracing paper, grid cloth, China balls) spread the source, create softer edges, and reduce harshness—critical for realistic night lighting .
– Bounce cards and reflectors redirect light subtly, often used to lift shadow densities without adding obvious new sources .
– Gels are applied to adjust color temperature, matching or contrasting different light sources for mood (e.g., blue gels for moonlight, CTO/CTB to warm/cool practicals) .
### Key Principles of Night Lighting
– Emphasize contrast: strong difference between lit and unlit areas dramatizes the shot and focuses attention .
– Motivated lighting: light placement should have an on-screen logic, such as traffic lights or neon signs, helping justify intensity and direction .
– Layering: mix various intensities and sources, sometimes through windows or doors, to build visual depth with minimal fill .
– Use of negative fill (black flags or curtains) absorbs stray light, deepening shadows for a true night effect .
These concepts have guided classic Indian films and contemporary productions alike. Directors of photography strategically balance naturalism, mood, and technical constraints to create immersive night scenes on screen .
Drafted by
CJ Rajkumar
Author/ Cinematographer